Blender How to Export FBX with Texture
.jpeg) |
| Blender How to Export FBX with Texture |
Export FBX with texture in Blender?
Are you looking to export fbx with texture in Blender? This can be a daunting task for anyone new to Blender, but with a few simple steps, you can have your model with a texture exported in no time. In this article, we'll walk you through the process of :
- creating material in blender 3d.
- adding a texture to blender.
- exporting 3d model in the FBX format.
How To Export FBX With Texture In Blender
- First, we'll select the default cube and delete it.
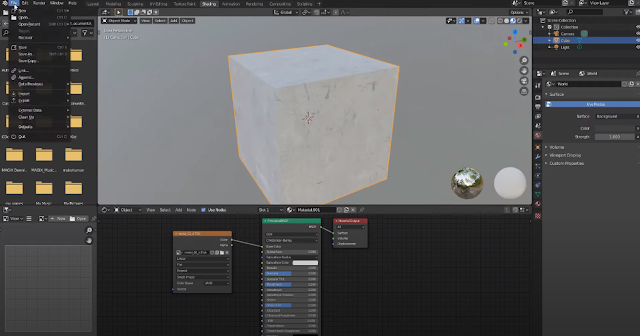
- Then, we'll add the cube back in and create a new material. To do this, we'll select Shading, New Material, and Shift A search.
- After that, we'll add an image to the material. Now, it's time to open up a brand new texture and add it to the material.
adding a texture to blender
Once the texture is added, it's time to export the 3d model. To do this, we'll go to File, Export, and FBX. Here, we'll need to change the Path Mode to Copy and select the Embedded Textures button. Then, we'll name the file and export it.
 |
| Export FBX with texture in Blender |
Fbx with texture in Blender
Now, we'll bring up Windows Explorer and move the file to a temp folder. Then, we'll double-click on the file and open it up. And there you have it - a model with a texture embedded in it.
Exporting fbx with texture in Blender doesn't have to be difficult. With these simple steps, you can have your model exported in no time. So, what are you waiting for? Give it a try and see the results for yourself!


![Retopoflow 4 [Beta] Blender Addon Free Download](https://blogger.googleusercontent.com/img/a/AVvXsEhyaOihAbyni3Ni796aaR1cuUFrxIdmDshfUg57Da_cEEK4Gt77BXLLxXuevcQ8plZOtWFi0S60R75q6EAGIsHFFJFH9Bo-6zZSJlAXU9Zcgak65xS5HdtqVfy8gQ9AQxgGRSlNGdY8XWXo2LDbAofrVtNAyDRNVZmn89Qk5U7Q648zn3XYht2HjLP-YVQ=w640-h330)


