Once the modeling of the character in blender is complete, the next step is to add blender facial expressions to the character. There is a function called shape key that is often used for expression. This is a function that saves deformations based on the original mesh. In this article, I will explain in detail how to use shape keys.
.jpg)
What are blender shape keys?
A shape key is a function that saves deformations based on the original mesh.
For each vertex of the mesh, how far the polygon has been moved from its original position can be saved and recalled as a state.
A shape key is a name in Blender, and is called a morph target or blend shape in other software. Also, manipulating shape keys is called morphing.

How to attach a shape key
Shape keys are added from properties. Select the object you want to add a shape key to and press + on the right side of the Shape Keys list.
When added for the first time, the original mesh data called Basis will be added, so press + again to add Key1.

Edit shape key
After creating a shape key, all you have to do is edit it in edit mode.
Don't forget to click on the desired shape key and then edit it in edit mode. Be careful, as it is quite possible to edit the wrong key by mistake.
Shape keys are used around facial expressions, but it is troublesome to move each vertex, and the silhouette of the model tends to collapse. Blender has a function called proportional editing, so it is recommended to edit the mesh while using this.
About shape key parameters
Parameters that can be set in properties cannot be taken outside of Blender. If you output to another software such as Unity or UnrealEngine, you don't have to worry too much.
Relative mode
This mode combines shape keys.
With Value, you can specify the strength of the selected shape key. Range Min / Max allows you to change the movable range of Value.
By specifying a vertex group for Vertex Group, you can mask only specific vertices from the shape key effect. Relative To allows you to specify which shape to deform relative to.

Absolute mode
Use this mode when deforming over time. Interpolation allows you to choose how to interpolate between shapes. Evaluation Time specifies the elapsed time (= frame).
The difference in interpolation is the image below. There is not much difference between Cardinal and Catmull-Rom.
Shape Key Lock
Locks the selected shape key to the 3D viewport regardless of its value. When this is turned on, Value is grayed out and always set to 1.

Shape Key Edit Mode
Reflects the synthesized shape in edit mode. Originally, in the shape key edit mode, you can only edit the geometry that the shape key has, but with this turned on, you can edit the geometry in which the shape key is combined.

Clear Shape Keys
The relative mode only. Reset all values to zero.
Re-time Shape Keys
The absolute mode only. Reframes shapes that have been added or reordered.
About shape key options
Options for the selected shape key can be selected from the v button just below the + and - buttons. There are many things that do not have a turn, but I will introduce them just in case.
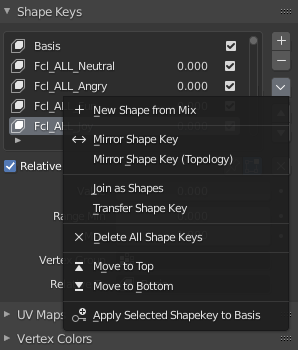
New Shape From Mix
Adds the currently compounded shape keys to the list as a single shape key.
Mirror Shape Key / Mirror Shape Key (Topology)
Flips the shape about the local x-axis. Mirror Shape Key (Topology) seems to be reversed by referring to the mesh flow, but it often doesn't work as expected.
Join as Shapes / Transfer Shape Key
Join as Shapes copies selected shape keys from models with the same number of vertices. Transfer Shape Key transfers the selected shape key to a model with the same number of vertices.
It can only be used to pass shapes between models that have exactly the same mesh structure. You must have multiple objects selected to use this option.
Delete All Shape Keys
Blow away all shape keys. ...... Horrible.
Move to Top / Move to Bottom
Moves the selected shape key to the top or bottom. If you want to go up or down by one step, use the △▽ button just below the v button.
Notes on shape keys
ShapeKeys aren't that versatile. There are some things to be aware of when using shape keys.
Timeline deformation transitions require animation
Since only shapes can be saved with shape keys, it is necessary to incorporate shape keys into the animation for lip-syncing to match dialogue and facial expression changes to match scene cuts.
It is not possible to express animation-like movements with only shape keys, such as wanting to move a vertex while curving it, or wanting it to pause at a certain point.
Complex shape keys make data heavy
The shape key saves the amount of movement of the moved vertices, so the more vertices you move, the heavier the data.
Shapes cannot be reused
Since the shape key depends on the mesh of the model, it cannot be used for other models. You have to set each character you create, so depending on the project, it can be a big loss.
If you want to reuse the facial expression data, consider moving it based on animation using bones.
Modifier cannot be rasterized
Note that this will become a problem later. Models with shape keys will not be able to rasterize modifiers. You can apply modifiers, but you will not be able to confirm them with the Apply button.
Be especially careful when using modifiers that involve geometry. (ex. Mirror modifier, Decimate modifier, Mask modifier, etc.)
Hard to edit the original mesh
If you edit the original mesh later, most shape keys will break. ShapeKeys store a shift difference from the original. If the original vertex is shifted horizontally by 1 meter, the shape key set for that vertex will also be shifted horizontally by 1 meter.
If the shape key collapses due to editing the original mesh, basically it is better to recreate the shape key.
Shape key limits by platform
As an aside... There is no limit to the number of shape keys a model can have. However, depending on the platform for uploading models, there are places where the upper limit is set, so you need to be careful about that point.
For example, a cluster has a limit of 64 blend shapes. There is plenty of room for 64 shapes, so I don't think I'll be able to use them all up, but it's better to check them out just in case.
summary
I explained how to use the shape key roughly.
Morphing using shape keys is essential for blender character models.


No comments:
Post a Comment